-
Drawing PrimitivesOpenGL/iOS_Metal 2019. 7. 3. 22:17
안녕하세요 dely입니다:)
오늘은 shader를 사용하여 화면에 그라데이션 되는 컬러를 입혀보겠습니다.
- vertices, indices 설정

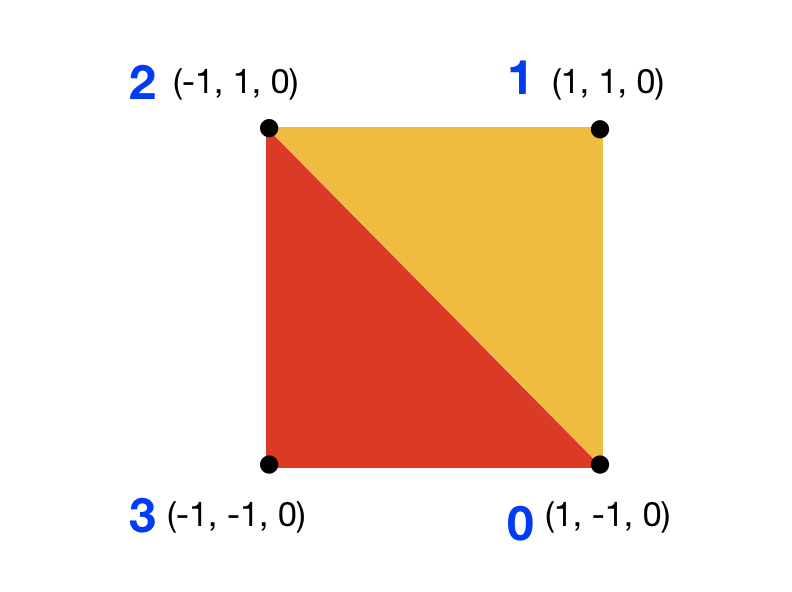
화면을 삼각 폴리곤 두개로 나누어 생각할 수 있는데요
삼각형은 점의 위치에 상관없이 항상 평면으로 만들 수 있기 때문에 폴리곤 기본 도형으로 쓰입니다..(라고 들었던 기억이 있습니다..)
그래서 화면에 컬러를 입힐 때 삼각형 두개로 나누어서 각 vertex 값을 배열에 입력합니다.
반시계 방향으로 입력합니다.
빨간 삼각형 : [1, -1, 0, -1, 1, 0, -1, -1, 0]
노랑 삼각형 : [1, -1, 0, 1, 1, 0, -1, 1, 0]
quad_vertex = [1, -1, 0, -1, 1, 0, -1, -1, 0, 1, -1, 0, 1, 1, 0, -1, 1, 0]
이 때 파란 배경색과 보라 배경색으로 표시한 vertex처럼
겹치게 되는 vertex는 폴리곤의 수가 많아질 수록
버퍼와 메모리에 큰 부담을 주게 됩니다.
그래서 다음 그림의 파란 글씨처럼 index를 주어 vertex를 사용하도록 합니다.

그것을 코드로 표현한 것이 다음과 같습니다.
var indices: [UInt32] = [0, 1, 2, 2, 3, 0]

var vertices = [
  Vertex(x:  1, y: -1, z: 0, r: 1, g: 0, b: 0, a: 1),
  Vertex(x:  1, y:  1, z: 0, r: 0, g: 1, b: 0, a: 1),
  Vertex(x: -1, y:  1, z: 0, r: 0, g: 0, b: 1, a: 1),
  Vertex(x: -1, y: -1, z: 0, r: 0, g: 0, b: 0, a: 1),
]
ViewController.swift에 속성값으로 넣어줍니다.
여기서 Vertex는 임의로 만들어준 type으로,
위치값을 나타내는 x, y, z 값과 색상값을 나타내는 r, g, b, a값을 한번에 shader로 넘기기 위함입니다.
Vertex.swift 파일을 만들어주고, 다음 코드를 입력합니다.
import GLKit

struct Vertex {
    var x: GLfloat
    var y: GLfloat
    var z: GLfloat
    var r: GLfloat
    var g: GLfloat
    var b: GLfloat
    var a: GLfloat
}
- vertices, indices를 버퍼에 담기
이제 위에서 입력한 vertex값들을 GPU로 넘겨주기 위한 버퍼들을 선언합니다.
private  var vertexBuffer : MTLBuffer!
private  var indicesBuffer : MTLBuffer!
그리고 setMetal() 메소드 안에서 metalDevice.makeBuffer()를 사용하여 버퍼를 초기화 해줍니다.
메소드의 매개변수인 bytes에는 각각 vertices와 indices의 주소값을 넣어주고, length에는 버퍼 사이즈를,
option으로는 .storageModeShared를 선택합니다.
let vertexBufferSize = vertices.size()
vertexBuffer = device.makeBuffer(bytes: &vertices, length: vertexBufferSize, options: .storageModeShared)

let indicesBufferSize = indices.size()
indicesBuffer = device.makeBuffer(bytes: &indices, length: indicesBufferSize, options: .storageModeShared)
vertices와 indices와 같은 Array에는 버퍼사이즈를 계산해주는 size라는 메소드가 없습니다.
따라서 다음과 같이 extension으로 버퍼사이즈를 계산해주는 size라는 메소드를 만들어줍니다.
extension Array {
    func size() -> Int {
        return count * MemoryLayout.size(ofValue: self[0])
    }
}
- vertices, indices 값 encoding하기
지금까지 device 세팅은 마쳤고, 이제 이것을 GPU에 넘겨주기 위해 encoding해줄 차례입니다.
draw()메소드 안에서 저번에 작성한
renderEncoder.endEncoding()이 코드 위쪽에 입력합니다.
renderEncoder.setVertexBuffer(vertexBuffer, offset: 0, index: 0)
renderEncoder.drawIndexedPrimitives(type: .triangle,
                                    indexCount: Indices.count,
                                    indexType: .uint32,
                                    indexBuffer: indicesBuffer,
                                    indexBufferOffset: 0)
앞에서 만들어둔 vertexBuffer를 사용하여
여러 primitives type 중 삼각형 모양으로 그려주도록 encoding 합니다.
- 셰이더 파일 생성
셰이더를 사용하여 입력받아온 vertices값의 위치와 색상값들을 이용해 컬러를 입혀보겠습니다.
먼저 Shaders.metal 파일을 생성합니다.
그 파일에 다음 코드를 입력합니다.(metal 셰이더는 c++ 형식)
struct VertexIn {
    packed_float3 position;
    packed_float4 color;
};

struct VertexOut {
    float4 computedPosition [[position]];
    float4 color;
};
셰이더에서는 기본적으로 입력을 받고 어떤어떤 효과를 적용하여 출력해주는 역할을 합니다.
그 어떤어떤 효과에는 색상을 흑백으로 만들어 줄 수도 있고,
입력들어온 이미지를 희뿌옇게 만들 수도 있습니다.
위의 코드는 입력과 출력의 형식을 만들어주기 위함입니다.
- vertex shader 작성
여기서는 renderEncoder로 입력받은 VertexIn 형태의 값을 사용해 화면좌표로 변환해줍니다.
그리고 VertexOut 형태로 fragment shader에게 넘겨줍니다.
basic_vertex 메소드의 매개변수로는 VertexIn 형태의 vertex_array와 셰이더 호출 시 설정한 호출 id인 vid가 있습니다.
다음 코드를 shaders.metal 파일에 입력합니다.
vertex VertexOut basic_vertex(const device VertexIn* vertex_array [[ buffer(0) ]], unsigned int vid [[ vertex_id ]]) {
    VertexIn v = vertex_array[vid];
    VertexOut outVertex = VertexOut();
    outVertex.computedPosition = float4(v.position, 1.0);
    outVertex.color = v.color;
    return outVertex;
}
- fragment shader 작성
여기서는 vertex shader에서 넘겨받은 값을 사용하여 pixel마다 어떤 컬러값을 둘지 설정해줍니다.
float4 type의 rgba return 값으로 넘겨주면 됩니다.
fragment float4 basic_fragment(VertexOut interpolated [[stage_in]]) {
    return float4(interpolated.color);
}
- 파이프라인 연결하기
위에서 만든 shaders를 파이프라인에 연결합니다.
MTLRenderPipelineState type의 pipelineState를 선언해줍니다.
private var pipelineState: MTLRenderPipelineState!setMetal() 메소드 안에 아래의 코드를 입력합니다.
셰이더에서 만들어준 basic_fragment()와 basic_vertex() 함수들을 파이프라인에 연결해줍니다.
let defaultLibrary = device.makeDefaultLibrary()!
let fragmentProgram = defaultLibrary.makeFunction(name: "basic_fragment")
let vertexProgram = defaultLibrary.makeFunction(name: "basic_vertex")

let pipelineStateDescriptor = MTLRenderPipelineDescriptor()
pipelineStateDescriptor.vertexFunction = vertexProgram
pipelineStateDescriptor.fragmentFunction = fragmentProgram
pipelineStateDescriptor.colorAttachments[0].pixelFormat = .bgra8Unorm

pipelineState = try! device.makeRenderPipelineState(descriptor: pipelineStateDescriptor)
그리고 마지막으로 draw() 메소드 안에서
renderEncoder.setVertexBuffer(vertexBuffer, offset: 0, index: 0)위의 코드 이전 위치에 아래의 코드 setRenderPipelineState() 를 입력해줍니다.
renderEncoder.setRenderPipelineState (pipelineState)그럼 완성!

출처
: https://www.raywenderlich.com/9211-moving-from-opengl-to-metal#toc-anchor-009
반응형'OpenGL > iOS_Metal' 카테고리의 다른 글
Hello Again, Metal (0) 2019.07.01 Add red triangle (0) 2018.10.13 Refactoring Fill the Yellow texture (0) 2018.10.12 Fill the Yellow texture (0) 2018.10.07 Hello Metal (0) 2018.10.06